In case you have no idea what this post is about, you should probably read the Introduction and Part 1 real quick. But besides that, let’s jump right into the creation of the demo environment. If you have any questions, please take a look at the other parts of this series.
Creating the demo environment
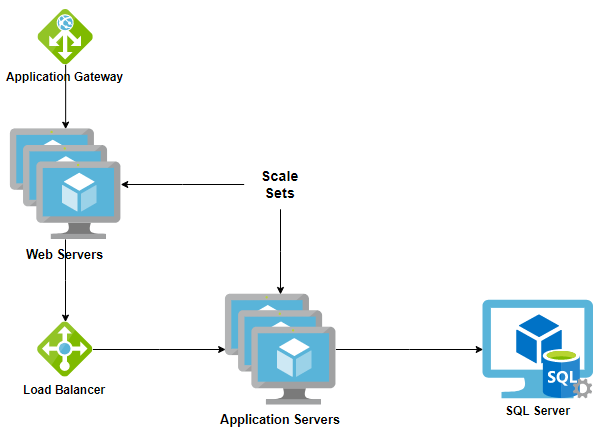
As you already know, there are a couple of resources to create (new Domain, SQL Server, Scale Sets for Application and Web Servers, …). The good thing is: you barely need to know anything about it if you just want the demo environment. But of course there is some preparation to do.
Prerequisites
First things first. There are still a couple of things left to do for you, before you can start. But I reduced it to a few steps.
- Make sure that you’re either an Administrator in the Subscription you’re creating the demo environment in or at least have the “User Access Administrator”-role – otherwise the script will fail at some point
- Download or clone the repository you can find here
- Validate the values in “Parameters.ps1” and extend the missing values in “PrivateParameters.ps1”
And of course you need a couple of PowerShell-modules installed. But the script will make sure they are there with the following piece of code. Make sure that you run VS Code (or whatever you use to execute it) with elevated rights if any of these modules are missing.
$modules = @("Az.Resources", "Az.Storage", "Az.KeyVault", "Az.Accounts", "Az.Compute", "Az.Network", "PSWorkflow")
foreach ($module in $modules){
    if (-not (Get-Module -Name $module -ListAvailable)) {
        Write-Verbose "Installing module $module"
        Install-Module -Name $module -Force
    }
    Write-Verbose "Importing Module $module"
    Import-Module -Name $module
}
That’s basically it. Let’s get into a bit more detail regarding the parameters.
PrivateParameters.ps1
This file does not contain any real sample values because they are private/personal (who’d have guessed, right?).
$subscriptionName = "<NEEDS TO BE SET>"
$objectID = "<NEEDS TO BE SET>"
To receive the value for “subscriptionName” you should execute Get-AzSubscription. The result of it should look something like this:
Name                           Id                                   TenantId                             State
----                           --                                   --------                             -----
Visual Studio Enterprise – MPN 00000000-0000-0000-0000-000000000000 00000000-0000-0000-0000-000000000000 Enabled
Pay as you go                  00000000-0000-0000-0000-000000000000 00000000-0000-0000-0000-000000000000 Enabled
If you don’t receive any output or an error message you probably have to run Connect-AzAccount before you start.
To receive the “objectID”-value you need to run Get-AzADUser and look for your username. The output you’ll receive will be a list with values like these:
UserPrincipalName : <user-/mail-alias>.onmicrosoft.com
ObjectType        : User
DisplayName       : Simon Fischer
Id                : 00000000-0000-0000-0000-000000000000
Type              :
You’ll need the value under “Id” for your account. This value is needed for they Key Vault-deployment. Otherwise no one will have access to the vault and you can not use it. I didn’t find a way to do this step via code, so if you have a suggestion how to retrieve the ObjectID for the logged-on user, please leave me a comment.
Parameters.ps1
Now, the interesting part. For the demo environment you can almost ignore the complete upper part of the file (up until the part where “$BCVersion” is specified. The part above of that are only helper functions to provide the parameters and besides a few exceptions (mainly in Get-StorageAccountTables) there are no relevant hard-coded values in these functions. Of course you should review them anyway. But the interesting values are in the lower third of the file.
Credentials
The most relevant parameters for you running this example are in the “Credentials”-block
# Credentials
$domainAdminUser = 'vmadmin'
$domainAdminPass = 'SuperSecurePassword!'
$domainAdminPassSecure = ConvertTo-SecureString $domainAdminPass -AsPlainText -Force

$vmAdminUser = $domainAdminUser
$vmadminPass = $domainAdminPass
$vmadminPassSecure = ConvertTo-SecureString $vmadminPass -AsPlainText -Force
Since we create a new domain (default name: bctest.local), we need credentials for a Domain Admin-account. Also each VM gets a separate Admin-Account (necessary during deployment). In this example I made it myself easy and just use “vmadmin” for both usernames and a really secure password (/s).
Resource Group
The “Resource”-block is the next relevant one. I don’t know about you, but I prefer a relative specific naming for the resource groups and other resources. I added the “Suffix”-part for the Resource Group name, because I had to test a lot and just incremented the no. in the suffix while the previous group on Azure was deleted. So please validate the naming here and the location for your resources:
# Main Resource infos
$resourceLocation = 'West Europe'
$resourceGroupSuffix = "001"
$resourceGroupName = "RG_ScaleSet$($resourceGroupSuffix)"

# Additional Parameters
$dnsNameLabelPrefix = "$($resourceGroupName)".Replace('_', '').Replace('-', '').ToLower() # mydnsname.westus.cloudapp.azure.com
I’ll skip the “Templates”-block, because the script depends on them and you shouldn’t just change them
Storage Account
There is not much for you to setup here, except the SKU of the Storage Account. I’d leave the table names as they are, because in the beginning I had these hard-coded and I’m not completely sure if there is a place left in code right now that uses a hardcoded value
# Storage Account infos
$storageAccountSku = 'Standard_LRS'
$storageTableNames = @{
    Setup               = "Setup"
    Environments        = "Environments"
    EnvironmentDefaults = "EnvironmentDefaultValues"
    Infrastructure      = "InfrastructureData"
    LogTable            = "Log"
    UsersTable          = "Users"
}
Names, Network and VM-Sizes
In the last part the most relevant block are the “nameSettings” I guess. The APS01/WEB01-values can practically be ignored, because the VMs are only temporary created. But you might want to have different names for the Domain, the SQL Server or the Scale Sets.
The IP-settings (would better be NetworkSettings, now that I think of it) use a couple of values I don’t really like, but are part of the Sample Domain template (like “adVNET” or “adSubnet”). The most important thing to know here, is that the ApplicationGateway needs to have it’s own Subnet (Azure-requirement)
Last but not least you can specify the VM-sizes in the last block. I just use ” Standard_DS3_v2″ for everything in the demo. But of course feel free to change them to whatever you like and can afford 😉
$nameSettings = @{
    Domain                         = "bctest.local"
    DomainNetBios                  = "BCTEST"
    SQL                            = "sql01"
    SQLComputerName                = "SQL01"
    APS                            = "aps01"
    APSComputerName                = "APS01"
    APSScaleSetName                = "AppScaleSet"
    APSLoadBalancerHostName        = "applb"
    APSLoadBalancerPublicIPName    = "AppScaleSetLB-PublicIP"
    WEB                            = "web01"
    WEBComputerName                = "WEB01"
    WEBScaleSetName                = "WebScaleSet"
    APSImageName                   = "ApplicationServerBaseImg_v1"
    WEBImageName                   = "WebServerBaseImg_v1"
    StorageAccountName             = "setupstorage001$($resourceGroupSuffix)".Replace("-", "").ToLower()
    KeyVaultName                   = "SetupValues001$($resourceGroupSuffix)"
    LoadBalancerNameInternal       = "AppScaleSetLB"
    LoadBalancerNamePublic         = "AppScaleSetLB-public"
    ApplicationGatewayName         = "WebScaleSet-AppGW"
    ApplicationGatewayPublicIPName = "WebScaleSet-AppGW-PublicIP"
}
$ipsettings = @{
    VirtualNetworkAddressPrefix           = "10.0.0.0/16"
    VirtualNetworkName                    = "adVNET" # NOTE: from Sample Deployment
    SubnetName                            = "adSubnet" # NOTE: from Sample Deployment
    SubnetNameApplicationGateway          = "ApplicationGateway" # Application Gate needs its own Subnet
    PrimarySubnetAddressPrefix            = "10.0.0.0/24"
    ApplicationGatewaySubnetAddressPrefix = "10.0.1.0/24" # Application Gate needs its own Subnet
    SQL1                                  = "10.0.0.10" # SQL Server 1
    APS1                                  = "10.0.0.20" # Application Server 1 (temporary)
    WEB1                                  = "10.0.0.30" # Web Server 1 (temporary)
    APSLoadBalancer                       = "10.0.0.50"
    ApplicationGateway                    = "10.0.1.20"
}
# Default: "Standard_DS3_v2" for everything
$vmSizes = @{
    DomainController          = "Standard_DS3_v2"
    SqlServer                 = "Standard_DS3_v2"
    ApplicationServer         = "Standard_DS3_v2"
    ApplicationServerScaleSet = "Standard_DS3_v2"
    WebServer                 = "Standard_DS3_v2"
    WebServerScaleSet         = "Standard_DS3_v2"
}
Summary
With these settings the deployment takes about 60 – 80 minutes. So in case you’re fine with the demo values, you can have your complete working demo environment in 1,5h from now 😊
Manual Step
When the script is done, there is one manual step to complete to be really done. You need to logon to “adVM”, from there RDP to the Application Server (with default values the VM should either be named “appscales000000” or “appscales000001”, depending which instance the Azure-algorithm kept). Start the BC client and connect to the database. During that step some initial first-run configuration is done to the demo-database (I don’t know in detail yet). But if you don’t do the step and open the webclient right away you’ll receive an error message (The Following SQl error was unexpected: Invalid object name ‘master.dbo.$ndo$srvproperty’.). If you know a way around that I’d be glad if you could help me out here.
After that please run the last real block of the script again (see below). This marks the setup complete and restarts the Scale Sets one last time before everything is finished.
# Mark Setup as complete and Restart Scale Sets to apply configuration (first step)
Set-StorageTableSetupDone -ResourceGroupName $ResourceGroupName -StorageAccountName $nameSettings.StorageAccountName -StorageTableNameSetup $storageTableNames.Setup
Write-Verbose "Restarting Scale Sets..."
$restart1 = Restart-AzVmss -ResourceGroupName $resourceGroupName -VMScaleSetName $nameSettings.APSScaleSetName -AsJob
$restart2 = Restart-AzVmss -ResourceGroupName $resourceGroupName -VMScaleSetName $nameSettings.WEBScaleSetName -AsJob
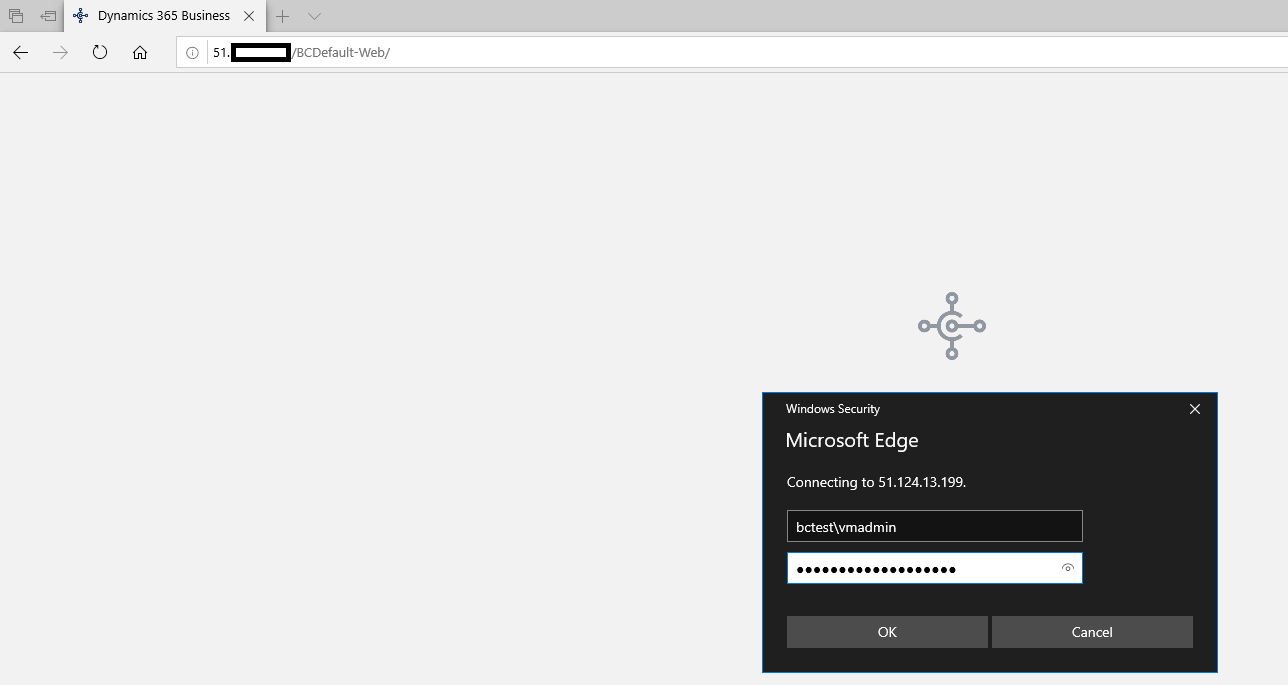
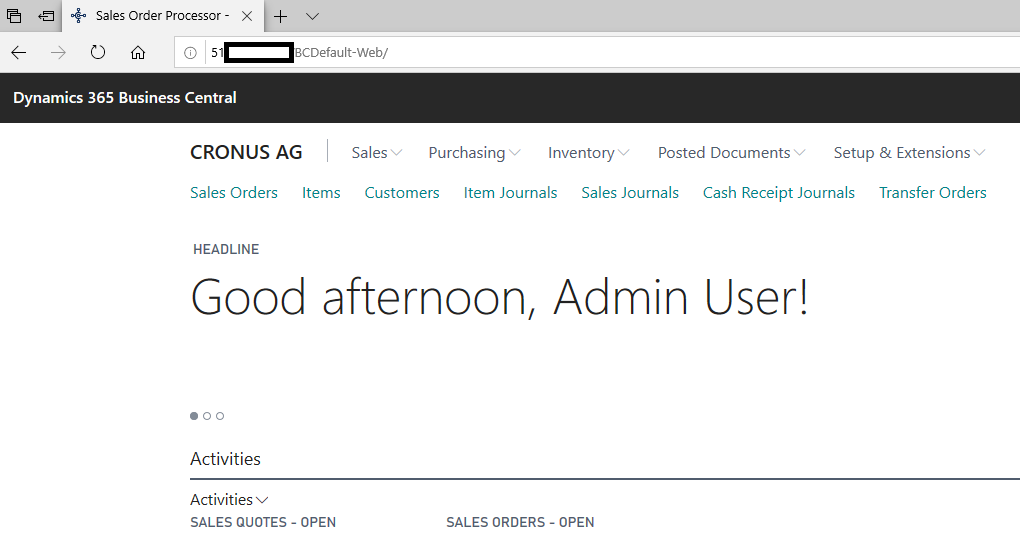
$restart1, $restart2 | Receive-Job -Wait | Out-NullAfter that you should be able to logon to the system. Get the IP from the Application Gateway (WebScaleSet-AppGW)

Then connect to http://[IP-from-AppGW]/BCDefault-Web (yes, it’s only http right now, not https) and you should be able to connect with “bctest\vmadmin” and your choosen password.
Further notes
During my initial tests with the MPN-subscription on my personal account I ran into Azure Quota Limits. If I remember correctly, I was only allowed for 20 CPU cores in the beginning. Depending on the number of tests you’re doing that limit is hit pretty fast. But a quick contact with the Azure Support and the limit was extended easily. So, depending on your subscription (especially with personal ones), you might also run into these limits.
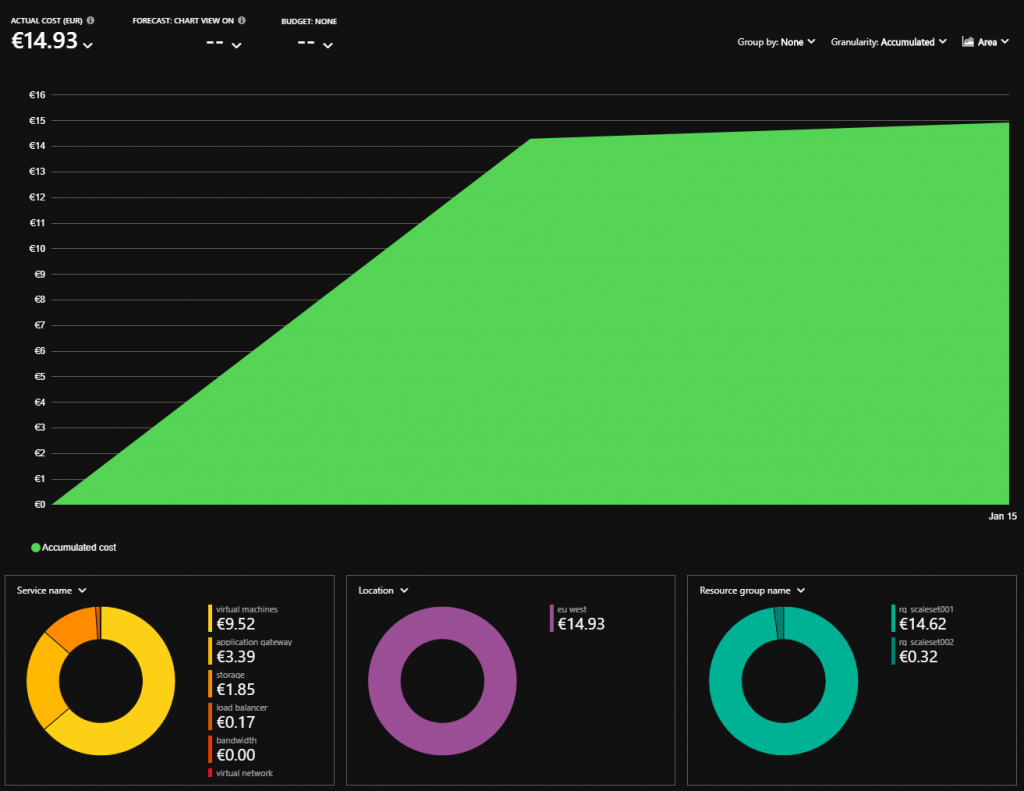
Costs to expect
Well, the complete setup (with the running VMs) costs about 15 EURs per day (at least that’s what my MPN-subscription says)
Feedback
I hope that this post helped you set up your own demo environment. If you have any questions, please feel free to contact me (Twitter, Github, Linkedin, …) or leave me a comment here. This whole “blogging” is still new to me and I yearn for your feedback 😊
This is so awesome, thanks a lot!
I know the solution for the master.dbo.$ndo$srvproperty error.
Hi Jaan,
thanks for your comment. Care to elaborate on this?
Cheers
Simon
Hi Simon,
Nice post, thanks for this great job. Do you know if it’s possible deploy Nav 2017 with scale set? And which step do you install the software in the image? I have been look in the repo and dont found nothig related.
Regards.
Hi Ronald,
you’re welcome 🙂 I think in general it should also work with NAV 2017, but the scripts might need some adjustment for this.
The image is prepared with templates/scripts from the repo “ARM-Templates”. For the VM-image it uses “VM-for-Image-Prep.json“. In that you’ll find a “CustomScriptExtension” which will download and execute the scripts specified here.
Before you try it out, I’d suggest to validate that “D365BCDownloadHelper” finds the correct download for NAV 2017 (it’s used in “004_DownloadAndExtractBC.ps1”.