In case you have no idea what this post is about, you should probably read the Introduction real quick. But besides that, let’s jump right into the first real chapter of this series.
Process Overview
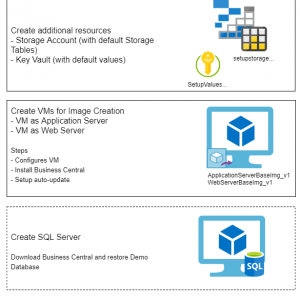
The following picture basically shows the high-level steps of the resources that are created (the ones with a dotted-line as a border are optional and used when creating the demo environment):
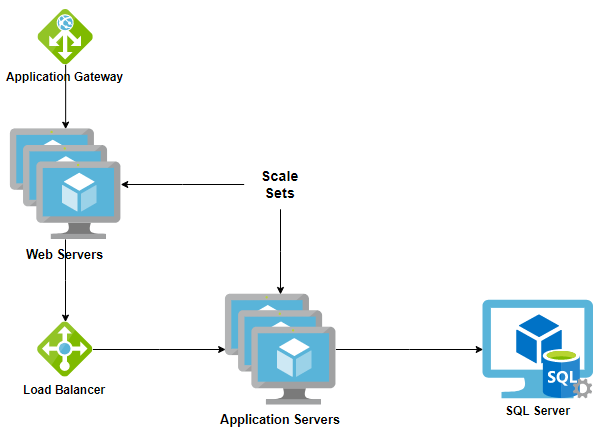
To be able to completely automate the setup, I needed to create a mechanism that allows to update the VM, without manual interference (e.g. Installing Business Central or configure the Webclient). Also it was necessary to reapply all configuration steps everytime there are new instances of the Scale Set (remember: each new instance is practically a blank VM, based on a previously configured image).
To achieve this, the setup creates a Storage Account with some Tables. These tables contain information (e.g. Commands and Configuration Data) for the VM (kind of like a Command-and-Control-server). The following tables will be created, when you execute the demo deployment:
- Setup: Contains all Commands that should be executed
- Environments: Contains Information about the NAV-/BC-services that are to be created
- EnvironmentsDefaultValues: Contains default configuration for the Services (KeyName/KeyValue; e.g. “ApiServicesEnabled” / “True”)
- Users: Contains information which users should be created
- InfrastructureData: Contains dynamic information about the setup; e.g. the Hostname and IP of the Load Balancer
Besides the Storage Account there is also a Key Vault. The Key Vault contains the Credentials for a Domain Admin (or at least for an user that has permissions to join other machines into the domain). The Values are encrypted and only readable for Administrators. To achieve this, the Scale Sets get a system-assigned identity, and this identity get’s the permissions to read the secrets in the Key Vault.
Each VM has a scheduled task setup, which executes after the machine is rebooted. The scheduled task basically only is a PowerShell-script (default location: C:\Install\AutoUpdate\AutoUpdate.ps1). This script will first create a session to Azure (the CmdLet Connect-FromMachineToAzAccount will use the Azure Managed Identity Endpoint to receive a token to connect), then it’ll check the Setup-table in the Storage Account for new commands and execute them one after another. For an overview of the available commands, please check out the README for this module on Github.
Modules
I created two main modules for this solution. You’ll most likely only directly use the D365BCOnAzureDeployment-module. But below I write a little something regarding the other module (D365BCOnAzureHelper) as well.
D365BCOnAzureDeployment
This modules is used for the deployment of the resources and will be used client-side. It currently contains the following public CmdLets:
New-ApplicationGatewayNew-DemoSqlServerNew-LoadBalancerNew-ScaleSetNew-ScaleSetImageNew-StorageTablesSet-InfrastructureDataSet-LoadBalancerConfiguration
Besides that there are a couple of internal CmdLets. I might jump into more details whenever necessary.
Above CmdLets are almost all we need to deploy the described demo environment. Of course we’ll also use stuff like New-AzResourceGroupDeployment pretty often, but it’s mostly pretty common Azure-stuff. Apart from that you’ll mostly only need to provide the right parameters (see Part 2 “Create Demo Environment“-post for explanations of the example)
D365BCOnAzureHelper
This modules will probably not be actively used by you. It is called in the background from inside the Scale Sets to take over the configuration of everything. The scheduled task (as mentioned above) will basically just call Start-CustomVMUpdate and load everything dynamically from there. It currently contains the following public CmdLets:
Invoke-AddUsersInvoke-CreateInstancesInvoke-CreateWebInstancesInvoke-RestartServicesInvoke-SetLoadBalancerDnsRecordInvoke-SetSpnForServicesInvoke-SetupDelegationInvoke-UpdateInstancesInvoke-UpdateLicensesInvoke-UpdateWebInstancesStart-CustomVMUpdate(this is the most relevant one)
Of course, there are a couple of internal helper CmdLets as well. As above, I’ll get into more detail on this whenever necessary. For an overview of the available commands for the VM auto-updater, please check out the README for this module on Github.
Templates
There are a couple of ARM templates I either created myself or I used existing templates for the demo environment. The following ARM templates are being used in this project:
- VM-for-Image-Prep; Template that creates the VM, which will be used as a basis for the generated image
- the Template will also download and execute a couple of scripts, when the machine deployment is ready. The scripts downloaded and executed can be found here on GitHub.
- Demo-Sql-Server; Template that creates the demo SQL Server (parts from myself, parts from some Microsoft-template [forgot to save the link])
- the Template will also download and execute a couple of scripts, when the machine deployment is ready. The scripts downloaded and executed can be found here on GitHub.
- Key-Vault; Template to create the Key Vault and already adds secrets
- Storage-Account; simple template that generates a Storage Account (ARM doesn’t support creating Storage tables, so it’s also partly done via PowerShell)
- VMSS-Default; Template to create the VM Scale Set
- Sample Domain; Template from Microsoft to create a new AD Forest, Domain and DC
Feedback
I hope that this gives you a somewhat good overview of the implementation. I’ll continue to add documentation to the the GitHub-repositories, so that it’ll get easier to follow my thoughts/ideas on this. If you like to have more information or think I missed important parts, please leave me a comment. Since I know the process in-and-out I might have forgotten about parts that would be relevant for others.
